6 September 2025
Laravel CI/CD with GitOps
Full CI/CD pipeline for a Laravel application on Kubernetes using GitLab CI for automated builds and ArgoCD for GitOps-based continuous deployment on a Hetzner VPS.
Why CI/CD is essential ?
CI/CD ( Continuous Integration and Continuous Deployment/Delivery ) is a cornerstone of modern software development, enabling teams to deliver high-quality applications faster and more reliably.
By automating the build, test and deployment processes, CI/CD pipelines eliminate manual errors, provide rapid feedback on code changes, and ensure that every new feature or bug fix is thoroughly vetted before reaching users.
This not only accelerates the development lifecycle but also fosters a culture of collaboration and continuous improvement, allowing developers to focus on writing code while the pipeline handles the rest.
For example: Think about your mobile apps like WhatsApp or Instagram. Developers update them regularly with new features or bug fixes. CI/CD ensures these updates are built, tested, and safely deployed automatically, so you get smooth updates without the app breaking.
Tech Stack Overview
- Laravel
- Docker
- Gitlab (For Repository)
- Gitlab CI/CD
- Gitlab Container registry
- Kubernetes (K3S distribution)
- ArgoCD
- Hetzner Server (4GB RAM / 2 CPU cores) (Price $5)
- Debian OS
- Cloudflare and 1 domain
- Portainer (For container management)
Our Goal
- Containerize the Laravel application for consistent environments across development and production.
- Deploy and manage the application on a lightweight Kubernetes cluster (K3s) running on a low-cost Hetzner VPS ( Virtual private server ).
- Automate the entire container image build, test process on every code push using Gitlab CI.
- Automate deployment via ArgoCD.
- Custom domain with HTTPS using Cloudflare DNS and SSL.
- Infrastructure visibility using Portainer and ArgoCD dashboard.
Repository
git clone https://gitlab.com/9ovindyadav/laravel-cicd.git
Project structure
laravel-appfolder contains our application code which we are going to deploy.Bashlaravel-app/ ├── app ├── artisan ├── bootstrap ├── components.json ├── composer.json ├── composer.lock ├── config ├── database ├── eslint.config.js ├── node_modules ├── package.json ├── package-lock.json ├── phpunit.xml ├── public ├── resources ├── routes ├── storage ├── tests ├── tsconfig.json ├── vendor └── vite.config.tsdockerfolder contains all the configs for building the container image.Bashdocker/ ├── compose.yaml # docker compose file ├── Dockerfile # file to build laravel app container images ├── entrypoint.sh # bash script which runs during container boot ├── initdb # sql script which runs during mysql boot │ └── default.sql ├── mysql.cnf # mysql config ├── nginx.conf # nginx config └── services ├── mysql.yaml ├── networks.yaml ├── phpmyadmin.yaml ├── production-app.yaml # laravel in production environment ├── local-app.yaml # laravel local development ├── redis.yaml ├── selenium.yaml └── volumes.yamlkubernetesthis folder contains all the kubernetes configuration needed for deployment.Bashkubernetes/ ├── apps # all running apps in k8s ├── argocd # argocd configs ├── proxy # gateway api config └── README.md.gitlab-ci.ymlthis file contains our entire CI pipeline code for build, test and deploy.
About our application
- This web application is built using
laravel 12 - Have Login and Register and Dashboard page
- Need following dependecies to run
- PHP and Composer
- Nginx
- Node and npm
- Mysql
- Redis
- Prerequisite for running the application locally
- Docker ( Installation script for Linux )
- To run the application
cdintolaravel-cicd- copy
.envfileBashcp laravel-app/.env.example laravel-app/.env - Start the app
Bash
docker compose -f docker/compose.yaml --env-file laravel-app/.env up - In Browser open localhost:9000
- Sign Up with new user in local running application and check health status
App containerization
To containerize the application let's see what we need to run the application first.
- Services needed for our application
nginxcontainerappcontainerjobcontainerschedulercontainerrediscontainermysqlcontainer
- For
nginx,redisandmysqlcontainer we are gonna pull the images fromhub.docker.comand pass the config via volume - For
app,jobandschedulerwe are gonna build a image usingDockerfile. We have also set aentrypoint.shto run container dynamically asapp,joborschedulerby passingAPP_ROLEenviroment variable - Building the image using DockerfileBash
docker build -f ./docker/Dockerfile --target prod -t <image-name>:<image-tag> ./ - View the build image by running
docker imagesin terminal
Container registry
Now our image is built and ready to use. let's push it to a container registry so that we can pull it in our kubernetes cluster and run.
The registry we are gonna use is provided by gitlab per project.
Our project Gitlab Container registry
Now to build and push the image follow these steps:
- Get the value for following variables and store in a file we will need all this later.Bash
CI_REGISTRY=registry.gitlab.com CI_REGISTRY_USERNAME=<username> // Gitlab username CI_REGISTRY_TOKEN=<access-token> // Create new access token with read_registry and write_registry permission - For access token go to
Profile > Edit profile > Access tokensand Create new access token withread_registryandwrite_registrypermission. - Docker Login to gitlab registryBash
docker login registry.gitlab.com - Build the image with registry name and tagBash
docker build -f ./docker/Dockerfile --target prod -t registry.gitlab.com/<username>/laravel-cicd:v0.0.1 ./ - push the image to registryBash
docker push registry.gitlab.com/<username>/laravel-cicd:v0.0.1
Gitlab CICD Setup
So what we are setting up in this CICD pipeline is build and deploy stage.
- Build
- Build a
laravel-cicddocker image - Push build image to
Gitlab container registry
- Build a
- Deploy
- Change new build image tag to
kubernetes/apps/lci/values.yamlfile - make a commit and push in the gitlab repository
- ArgoCD will monitor the repository for configuration changes and apply to the Kubernetes cluster.
- Change new build image tag to
Pipeline configuration is written in gitlab-ci.yml file placed at the root of the repository.
Whenever you make new commit in repository and push to the main branch pipeline will get triggered which will start build and deploy jobs.
Since these jobs are running in a docker container they need access to Gitlab container registry to push build images and Gitlab repository to new commit changes.
These variables need to be create in gitlab so that pipeline can access credentials and run the jobs successfuly.
Go to: Gitlab Repository > Settings > CI/CD > Variables > Project variables
Create these project variables with visibility masked and flags expanded.
DOCKER_REGISTRY: registry.gitlab.com
DOCKER_REGISTRY_USER: <gitlab username>
DOCKER_REGISTRY_TOKEN: <personal-access-token> # token with read and write registry access

GIT_REPO_USER: <gitlab username>
GIT_REPO_TOKEN: <personal-access-token> # token with read and write repository access
Now whenever you make new commits and push to gitlab pipeline will get triggered and build the image and push it to container registry in your project at Gitlab Repository > Deploy > Container registry > laravel-cicd location.
Server setup
Requirement:
- 2GB RAM and 2 core amd64 CPU
- Available cloud providers - AWS, GCP, Azure, Hetzner
AWS is good with free tier but billing is too complex here. which may get us in a trouble. So for simplicity and fix charges/month i am gonna use hetzner.
Go get a hetzner cloud account and login to the dashboard.
- Create a new project named
laravel-cicd - Go to project dashboard
- Go to
serverssection and clickadd server - Choose
- Location:
Helsinki - Image:
Debian 12 - Type: Shared vCPU (x86) CX22
- SSH Keys: Add or else you will get credentials in email and update latter in server
- Firewalls: Create and allow port 22, 80, 443, 6443
- Name: name your server and create
- Location:
- Login into server and update OS
- Get the
public ipof the server - Check your email and get credentials for
rootuser - Get into your terminal and enter the following details to ssh into created server
Bash
ssh root@<server public ip> - Check the os details
cat /etc/os-release - Update the OS
Bash
apt update && apt upgrade
- Get the
- Setup password less access using ssh keys
- Open a new terminal into your local system
- Create a ssh private and public key pair
Bash
ssh-keygen -t ed25519 -C "Hetzner server access" -f ~/.ssh/hetzner -N "" - Copy the content of file
~/.ssh/hetznerBashcat ~/.ssh/hetzner - Open a new terminal and SSH into your server with password
- Create a file
~/.ssh/authorized_keysand paste the content copied from~/.ssh/hetznerfile located in your local system - Now exit out of your server and try to ssh without password
Bash
ssh -i ~/.ssh/hetzner root@<server public ip> - Set up ssh alias for this long command into
~/.ssh/configto make your life go easyBashHost server-238 HostName <server public ip> User root Port 22 AddKeysToAgent yes Identityfile ~/.ssh/hetzner - Now you can login into your server like this
Bash
ssh server-238 - If all this works out. you can disable password authentication to enhance security of your server.
Bash
# Edit file
sudo vim /etc/ssh/sshd_config

# Enable
PubkeyAuthentication yes

# Disbale
PasswordAuthentication no

# Restart sshd
sudo systemctl restart sshd
DNS setup
To make accessing our applications easier and more secure, we'll configure a domain name with a wildcard DNS and set up TLS encryption using Let's Encrypt.
- Purchase a Domain
- Buy a domain from any provider like Hostinger or GoDaddy. let's assume you purchased
9ovind.in - We'll be using wildcard DNS to allow subdomains like
app1.9ovind.in,admin.9ovind.in.
- Buy a domain from any provider like Hostinger or GoDaddy. let's assume you purchased
- Configure DNS Records
- Login to your DNS provider's dashboard and add the following record like this pointing to your server
Public IP.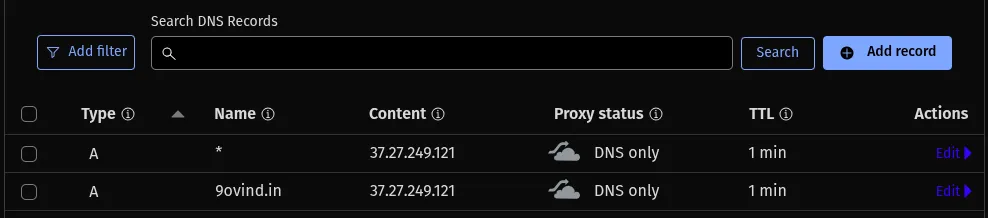
- Login to your DNS provider's dashboard and add the following record like this pointing to your server
- Get a TLS certificate from
Let's Encrypt- Install Certbot on your server. We'll use DNS-based validation since we're generating a wildcard certificate.Bash
# Install certbot sudo apt install certbot # Request Wildcard Certificate (Manual Challenge) sudo certbot certonly --manual \ --preferred-challenges=dns \ -d "*.9ovind.in" -d "9ovind.in" \ --agree-tos --no-eff-email --email you@example.com - Follow the On-Screen Instructions
Certbot will ask you to create a TXT record something like this.BashPlease deploy a DNS TXT record under the name _acme-challenge.mylaravelblog.com with the following value: AbC123xYzSuperSecretChallengeString - Go to your DNS provider’s panel and add a TXT record. wait a few minutes for DNS to propagate and check with this.Bash
dig TXT _acme-challenge.9ovind.in +short - Once Propagated, Certbot Will Complete the Process and The certificate files will be saved at
/etc/letsencrypt/live/9ovind.in/
- Install Certbot on your server. We'll use DNS-based validation since we're generating a wildcard certificate.
- Copy the TLS certificate and private key and save in the repo at
kubernetes/proxy/certs/9ovind.in/.- Certificate in file
tls.cert - Private key in file
tls.key
- Certificate in file
We will need these files for setting up TLS in our kubernetes cluster at
Gateway API.
Kubernetes Cluster
Local system setup
Install these tools on your local system for accessing and managing the cluster.
- Kubectl
Bash
curl -LO "https://dl.k8s.io/release/$(curl -L -s https://dl.k8s.io/release/stable.txt)/bin/$(uname -s | tr '[:upper:]' '[:lower:]')/$(uname -m)/kubectl" chmod +x kubectl sudo mv kubectl /usr/local/bin/ - Helm
Bash
curl https://raw.githubusercontent.com/helm/helm/main/scripts/get-helm-3 | bash
Common steps on all VMs
- Turn off swap
Bash
sudo swapoff -a sudo vim /etc/fstab # look for /swapfile none swap sw 0 0 and comment sudo rm -f /swapfile df -kh # look for space - Change hostname
Bash
sudo vim /etc/hostsname // cp-<last ip digit> or worker-<last ip digit>
sudo vim /etc/hosts

sudo reboot
Control plane
- First Control plane node setup
Bash
curl -sfL https://get.k3s.io | sh -s - server \ --disable traefik \ --disable servicelb \ --cluster-init \ --tls-san=Public-IP - Copy
/etc/rancher/k3s/k3s.yamlto local~/.kube/configand updatePublic IPof server for local kubectl - get the worker node registration token
Bash
sudo cat /var/lib/rancher/k3s/server/node-token
Join nodes
If you have multiple servers available you can join them all using below commands as worker or Control plane nodes.
- Joining Worker Node
Bash
curl -sfL https://get.k3s.io | K3S_TOKEN=<first-cp-token> sh -s - agent --server https://<first-cp-ip>:6443 - Joining Another Control plane Node
Bash
curl -sfL https://get.k3s.io | K3S_TOKEN=<first-cp-token> sh -s - server \
    --server https://<first-cp-ip>:6443 \
    --tls-san=Public-IP
Taint Control plane
For restricting the scheduling of pods on Control plane we can tant the nodes.
# Apply taint
kubectl taint nodes <node-name> node-role.kubernetes.io/control-plane=:NoSchedule

# Remove taint
kubectl taint nodes <node-name> node-role.kubernetes.io/control-plane-
Gateway API setup
- Label node on which you want to schedule
Gateway APIBashkubectl label node <node-name> gateway=true - Add helm repo and Gateway CRDsBash
helm repo add traefik https://traefik.github.io/charts helm repo update # Standard CRDs for GatewayClass, Gateway, HTTPRoute, GRPCRoute, ReferenceGrant kubectl apply -f https://github.com/kubernetes-sigs/gateway-api/releases/download/v1.2.1/standard-install.yaml # Experimental CRDs for TCPRoute, UDPRoute, TLSRoute kubectl apply -f https://github.com/kubernetes-sigs/gateway-api/releases/download/v1.2.1/experimental-install.yaml - Create namespaceBash
kubectl create namespace traefik - Create TLS for your domainBash
# Change directory cd kubernetes/proxy/certs/<domain name>/ # Create TLS secret kubectl create secret tls <domain name>-tls --cert=tls.crt --key=tls.key -n traefik - Update
kubernetes/proxy/traefik/values.yaml. Replaceexample.comwith your<domain-name> - Upgrade or Install treafikBash
# Change directory
cd kubernetes/proxy/traefik

# Install Traefik gateway
helm upgrade --install traefik traefik/traefik \
--namespace traefik \
-f values.yaml
demo-nginx app for testing the cluster setup
Change your directory to kubernetes/apps/demo-nginx and apply all these files.
Update route.yaml file with your <domain name>
- Deployment
Bash
kubectl apply -f deployment.yaml - Service
Bash
kubectl apply -f service.yaml - HTTPRoute
Bash
kubectl apply -f route.yaml
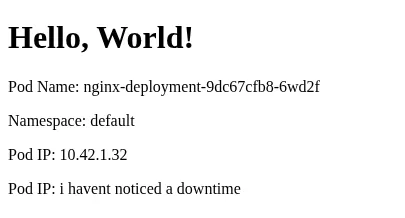
If your DNS setup was working. when nginx-demo.example.com you will get an html response like this.
ArgoCD setup
Note: first make sure you are in cd kubernetes/argocd folder
- InstallationBash
kubectl create namespace argocd kubectl apply -n argocd -f https://raw.githubusercontent.com/argoproj/argo-cd/stable/manifests/install.yaml - Edit configmap to disable https in argocd for nginx-gatewayBash
kubectl edit configmap argocd-cmd-params-cm -n argocd - Place the following lineYAML
data: server.insecure: "true" - Rollout the deploymentBash
kubectl rollout restart deployment argocd-server -n argocd - Create a routeBash
cd kubernetes/argocd kubectl apply -f route.yaml - Login info
- Go to browser and open the argocd urlYAML
User - admin Password - <we have to get from secrets> - Get the password from secretsBash
kubectl get secrets/argocd-initial-admin-secret -n argocd -o yaml - Copy the password , it's a base64 encoded string we have decode it firstBash
echo "<password>" | base64 --decode - Update
adminpassword in argoCD for more security.
- Go to browser and open the argocd url
- Setup repositoryBash
# Repositories kubectl apply -f repositories.yaml - Create
root-appforApp of Appspattern.Bash# Root app kubectl apply -f root-app.yaml
Thisroot-appwill trackkubernetes/argocd/applicationsfolder and create all apps in argocd automatically. you just have to make a application file and commit changes to git.