1 October 2025
What is a web server and role of nginx in it ?
What web servers actually do, how Nginx handles thousands of concurrent connections with its event-driven architecture, and how to configure it for real workloads.
Introduction
The World Wide Web (WWW) was invented in 1989 by Tim Berners-Lee, but it wasn’t until 1991 that it became publicly available. Since then, the internet has evolved dramatically, with billions of users accessing websites daily. At the core of this communication lies the web server a foundational component that delivers content from a server to a user's browser.
Among the most popular web servers today is Nginx (pronounced engine-x), known for its high performance, scalability, and efficiency.
The problem it solves
Imagine writing a custom web server from scratch every time you build an application. You’d need to handle:
- Networking (managing TCP connections, sockets, etc.)
- HTTP protocol compliance (handling GET, POST, headers, caching)
- Concurrency (serving thousands of clients at once)
- Security (TLS/SSL, request limits, filtering)
That’s a lot of work for something every developer needs.
Nginx solves this by providing reusable web server that works across programming languages and frameworks. Instead of reinventing the wheel, developers can let Nginx handle the web traffic while their application focuses on business logic.
Architecture
At its core, Nginx follows a client-server model:
- A client (Browser, API consumer, Mobile app) sends an HTTP request.
- The server (Nginx) processes that request and sends a response.
Default Ports by convention on which all web servers listen:
- Port 80 → HTTP
- Port 443 → HTTPS (with SSL/TLS)
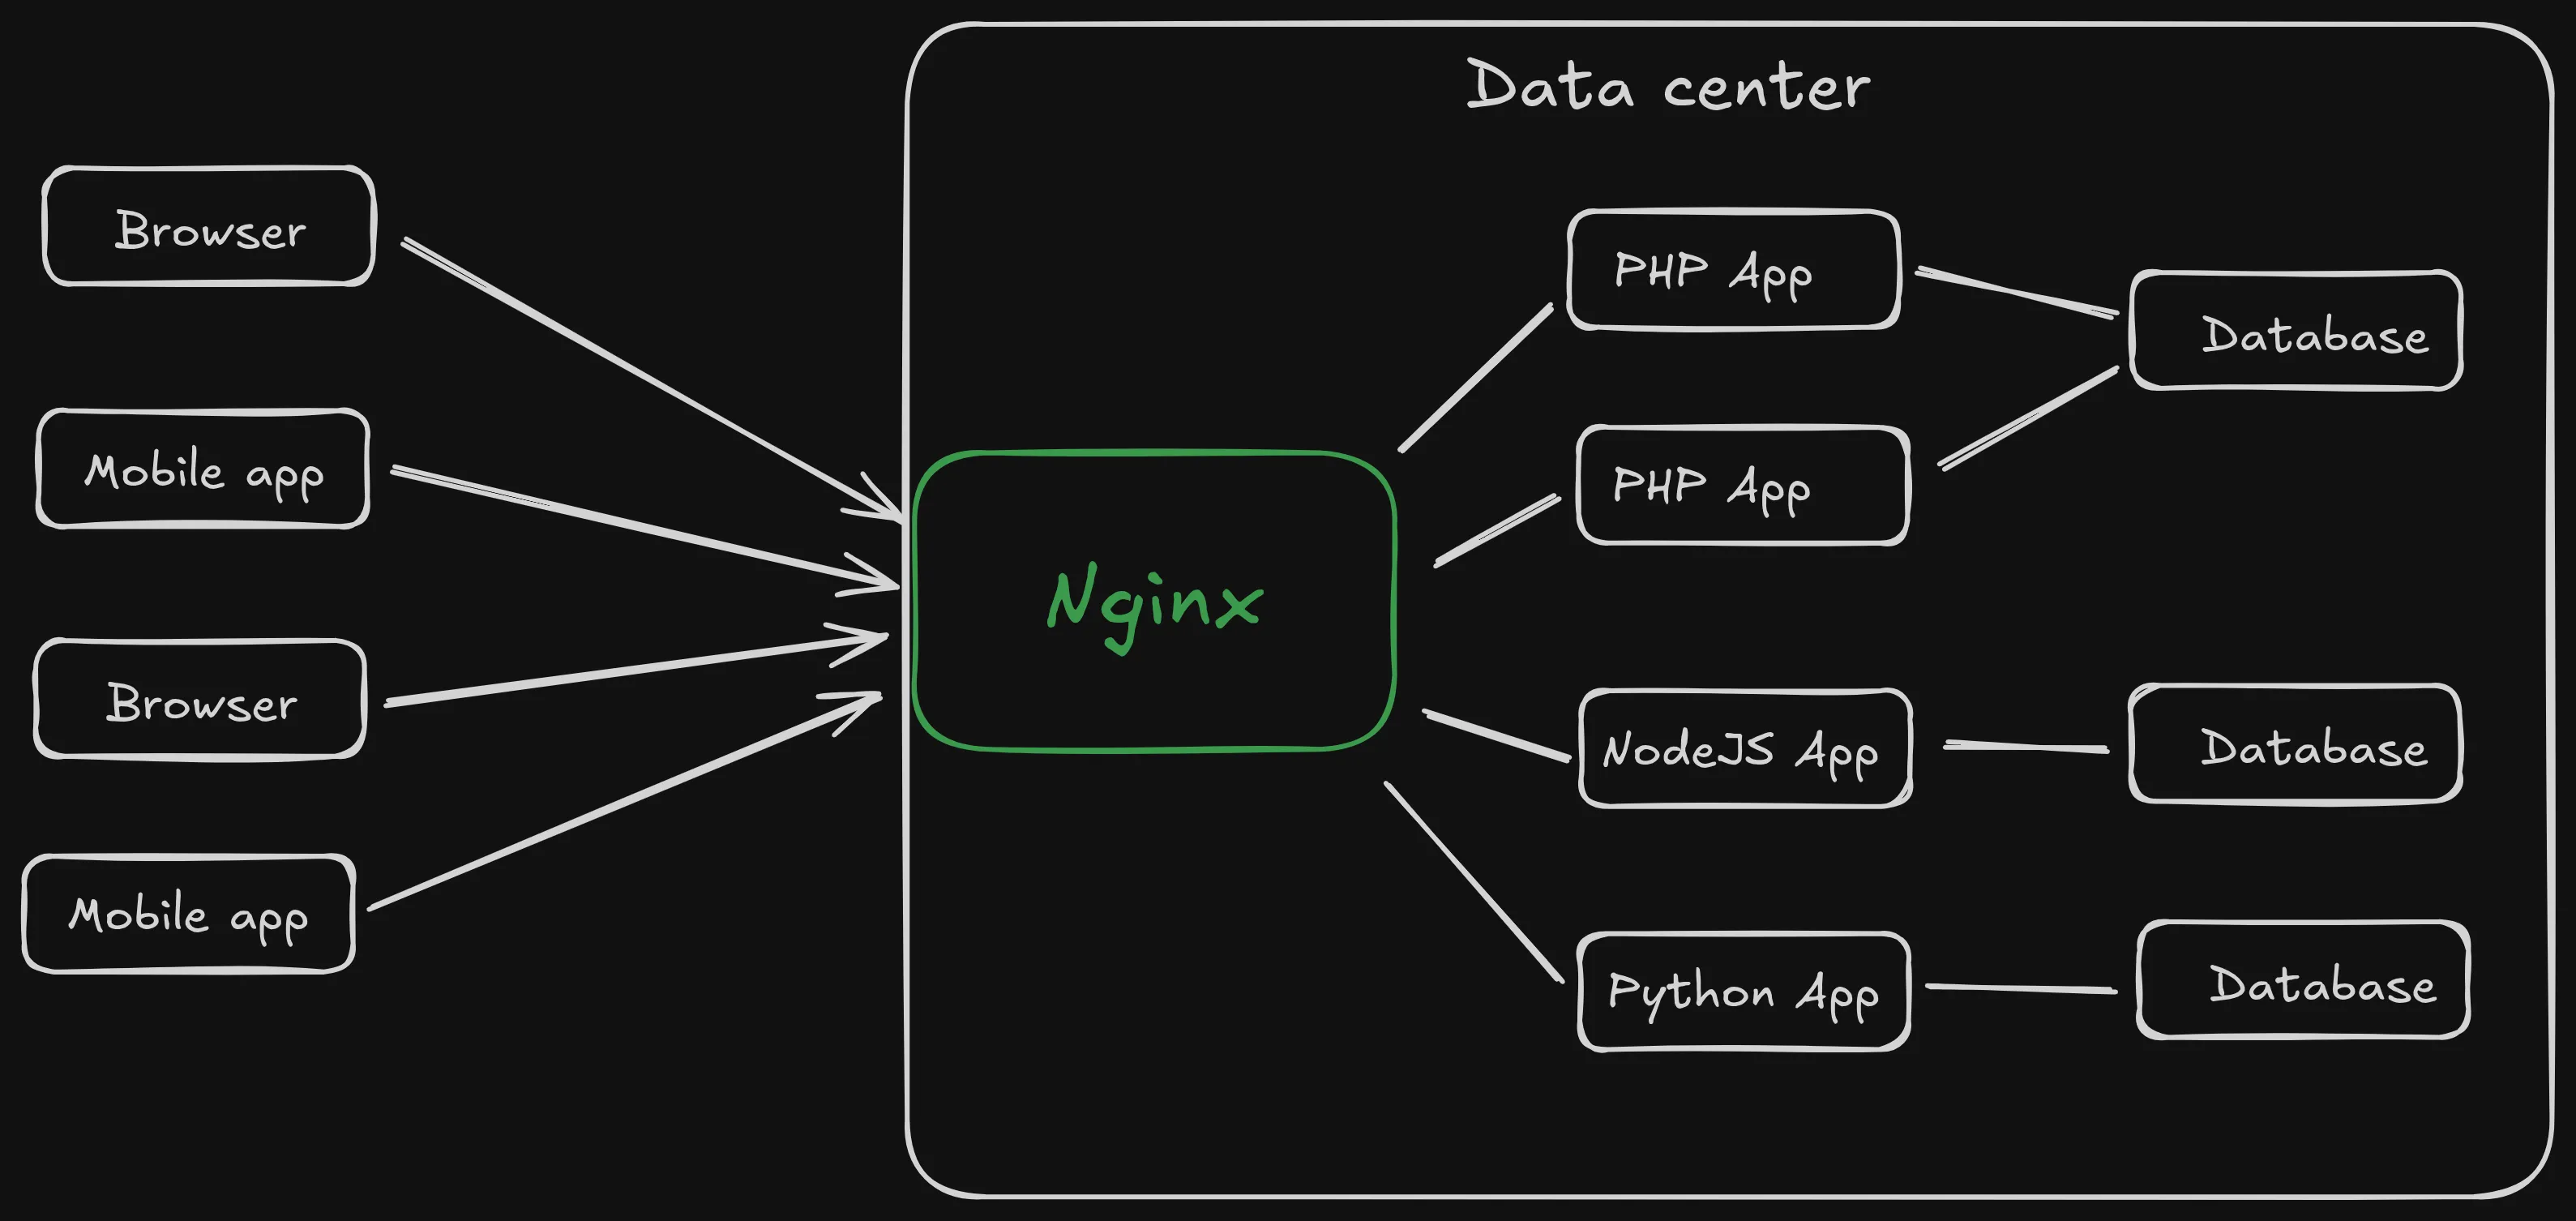
NGINX acts as an intermediary between the client and the web services. It handles the client requests and routes it to the backend web service. It is also known as a reverse proxy and can load balance the request among multiple backend servers.
While NGINX solves most of the problems with traditional web service architecture, it still needs to solve:
- Concurrent connections - Large number of concurrent connections from clients.
- Performance - No performance degradation with user growth.
- Efficient resource utilization - Low memory usage and optimal CPU utilization.
Before diving into the solution, let’s revisit connection management basics and understand the scalability bottlenecks.
How are the connections handled ?
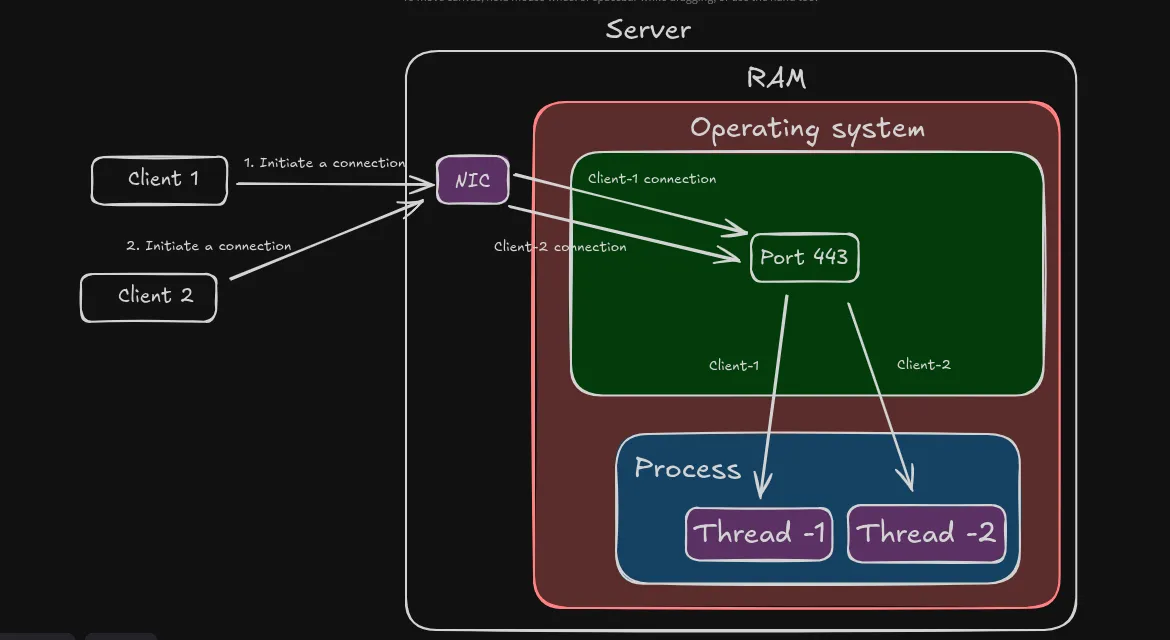
When a web server starts, it calls the operating System and passes the port on which it listens. For e.g., Web servers would pass port 80 (http) or 443 (https) to listen.
When the client connects, the OS’s kernel stack performs a TCP handshake and establishes a connection. The OS assigns a file descriptor or a socket for each connection.
The below diagram shows the connection establishment between the client and the server:
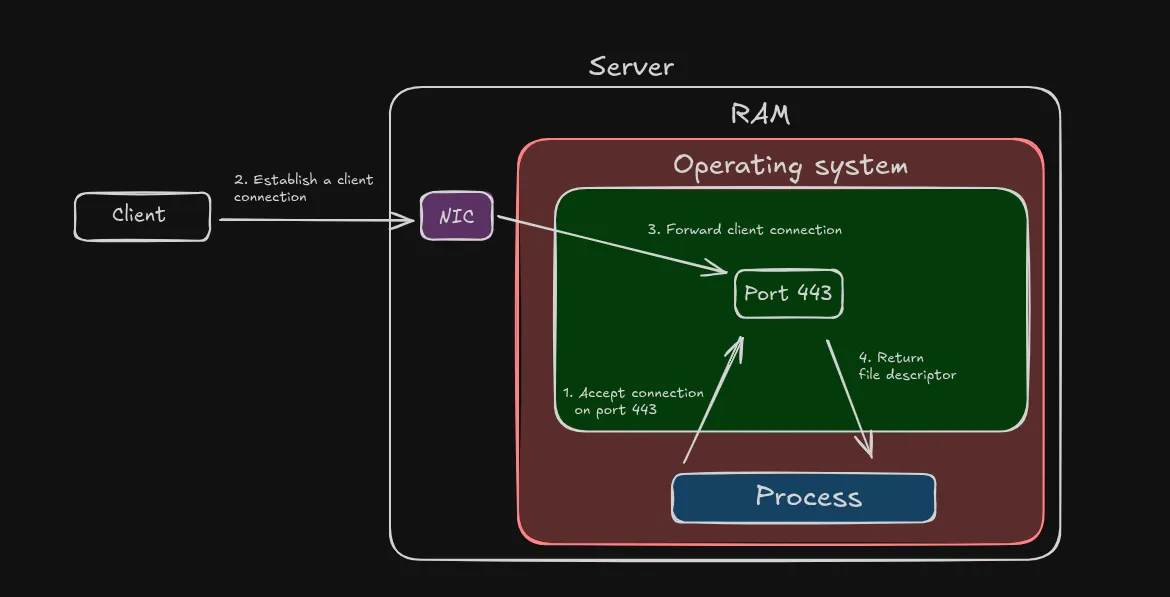
Note: NIC stands for Network interface card
By default, sending and receiving data over a network (Network I/O) is blocking. A thread or a process goes into waiting state while writing or reading data to/from the network.
Also, the network I/O is dependent on the client’s bandwidth. Data transfer may take a long time for slow clients.
The following diagram shows how a process waits until the complete data transfer:
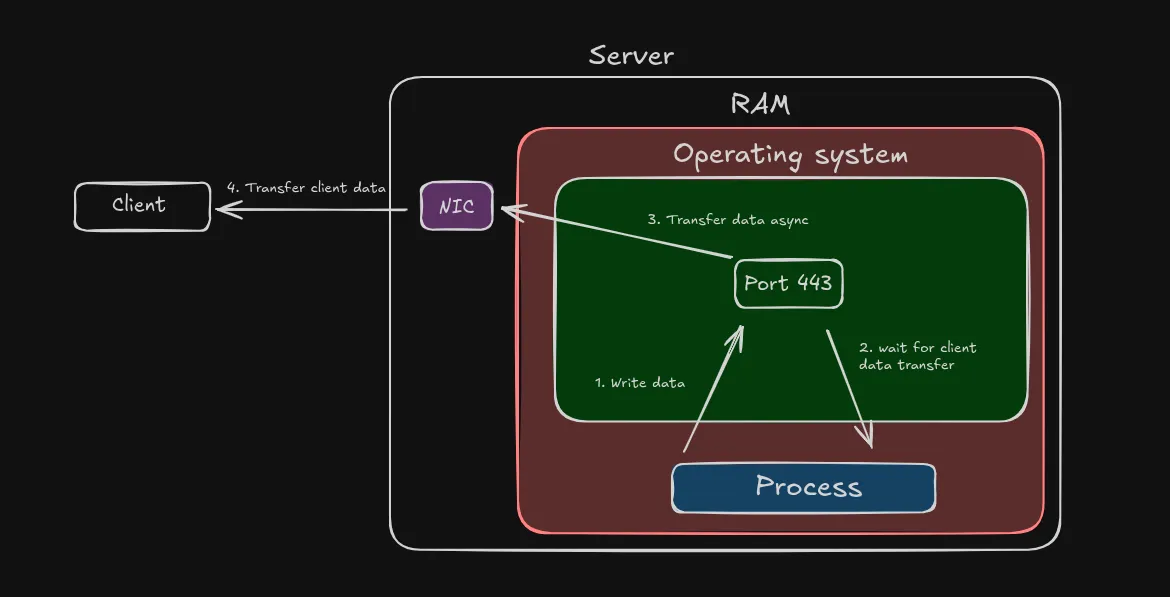
As a result, the server can’t accept new connections if it’s already processing request from a client. This hinders the system’s scalability and performance both.
There are several ways to tackle this problem and handle more connections. Let’s understand the different approaches and their limitations.
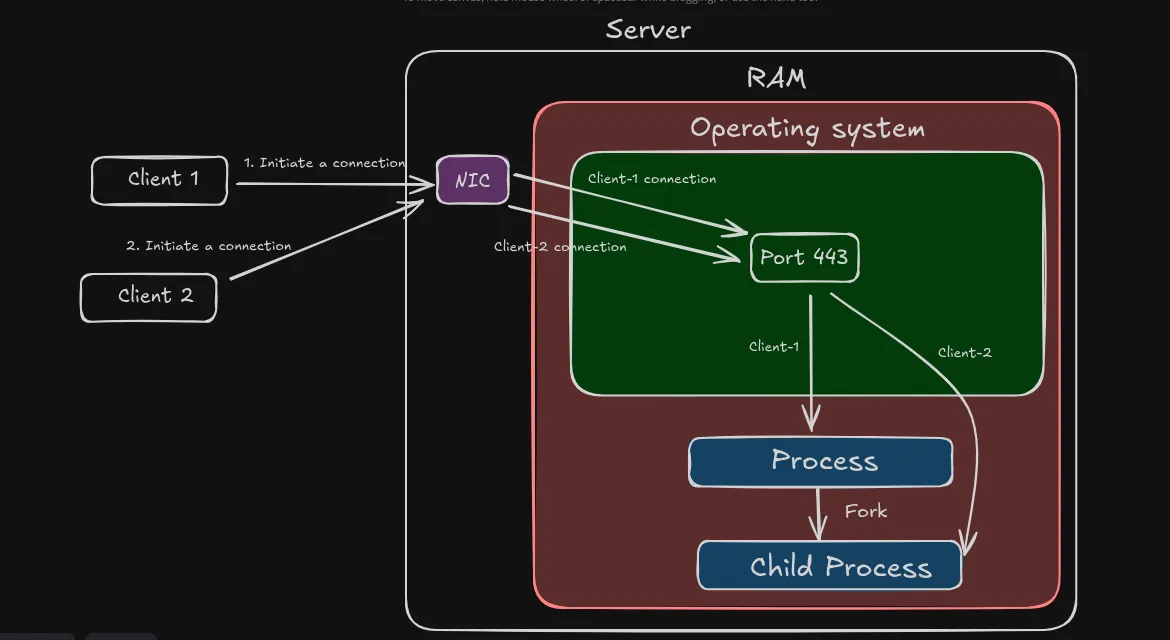
Process-Per-Request Approach
To overcome the network I/O bottleneck, the process can fork a new child process. The child process would then handle a new client connection.
Every connection would correspond to a new child process. Once the request/response cycle is completed, the child process would be killed.
The below diagram illustrates this process:
Do you think this approach would scale to millions of users/connections ? Take a moment to think and then continue reading
Let’s assume the server RAM size is 32 GB and each process takes 100 MB. So, then it can handle only 320 (32 GB/ 100 MB) connections in the best case.
Here are some downsides of this approach:
- Scalability Issues - Number of connections depend on the hardware (RAM size). More connections would lead to out of memory issues.
- Performance Issues - Forking a child process is slow and would impact the performance.
Can we do better ? What if instead of forking a process, we launch a thread ? Let’s explore this approach in the next section.
Thread-Per-Request Approach
In this approach, a thread is launched every time a client connection is established. Each request is handled independently by a different thread.
The below diagram shows how this model works:
Threads are lightweight and almost 1/10th size of a process. As a result, this is a significant improvement from the Process-Per-Request approach.
While this approach can handle more number of connections, it would still run into issues highlighted in the previous section.
A process can’t launch an infinite number of threads. The benefits of multi-threading diminish with large number of threads due to frequent CPU context switching.
We can still improve by using a thread pool and launching a fixed number of threads. For eg:- 500 threads in the process.
This improvement would result in efficient memory usage. However, if all the threads are busy, the new connections would wait in the request queue resulting in slowness.
Hence, this approach also doesn’t solve for scalability and performance. We can’t scale since the primary bottleneck is the time-consuming network I/O.
Is there a way to unblock the process or thread during the network I/O ? Yes, and NGINX employs an intelligent tactic using its event-driven non-blocking I/O.
Let’s understand NGINX’s architecture in detail in the next section.
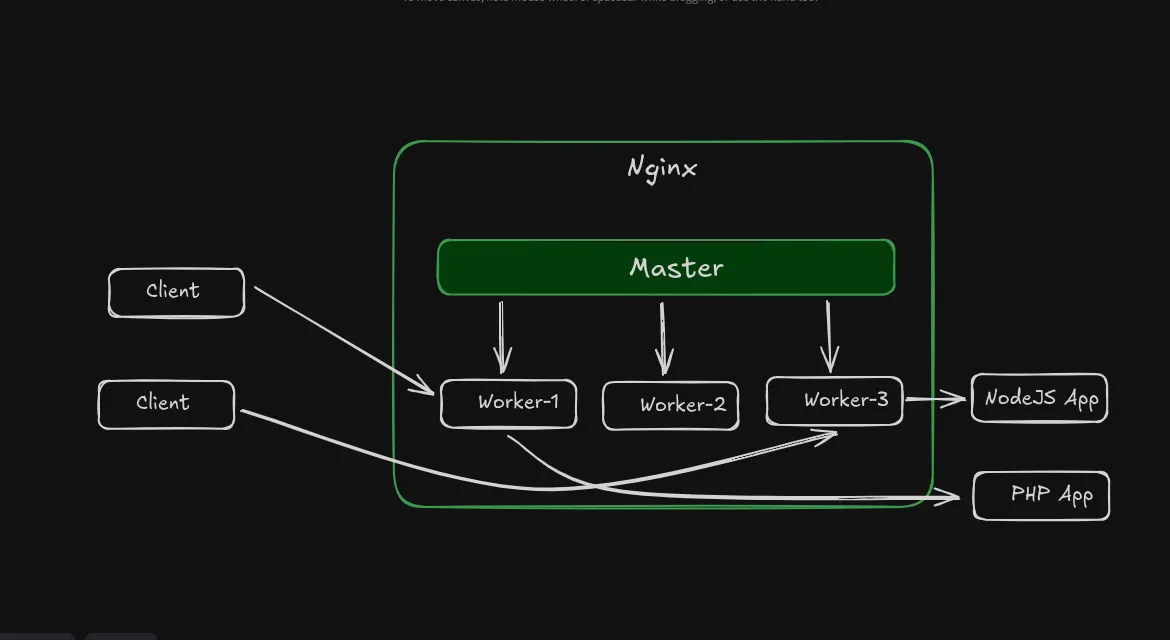
NGINX Architecture
NGINX uses a modular architecture and consists of several components such as:
- Master process - It acts as the central controller and is responsible for starting, stopping, and launching the worker processes.
- Worker processes - These run the core NGINX logic and are responsible for connection handling, request forwarding, load balancing, etc.
Let’s now dive into the details of how NGINX can scale to million concurrent connections.
Event-driven Non-blocking I/O
In case of non-blocking I/O, the web server or the application doesn’t wait for the client’s data. Instead, the OS informs the application once the data is available.
This makes the process event-driven. Whenever the client’s data is available, the application would get interrupted and it would process the data. Otherwise, it would continue to do something else.
Further, the application doesn’t go into a waiting state. It can execute other tasks and efficiently utilize the CPU.
Internally, the application uses a system call called epoll or kqueue and then registers the sockets. The operating system uses a kernel data structure (Epoll instance) to keep track of the sockets that an application is interested in.
Once data is available in a subset of sockets, those sockets are moved into a ready list. The OS then informs the application about those sockets. Finally, the application then processes the data.
The below diagram illustrates this flow:
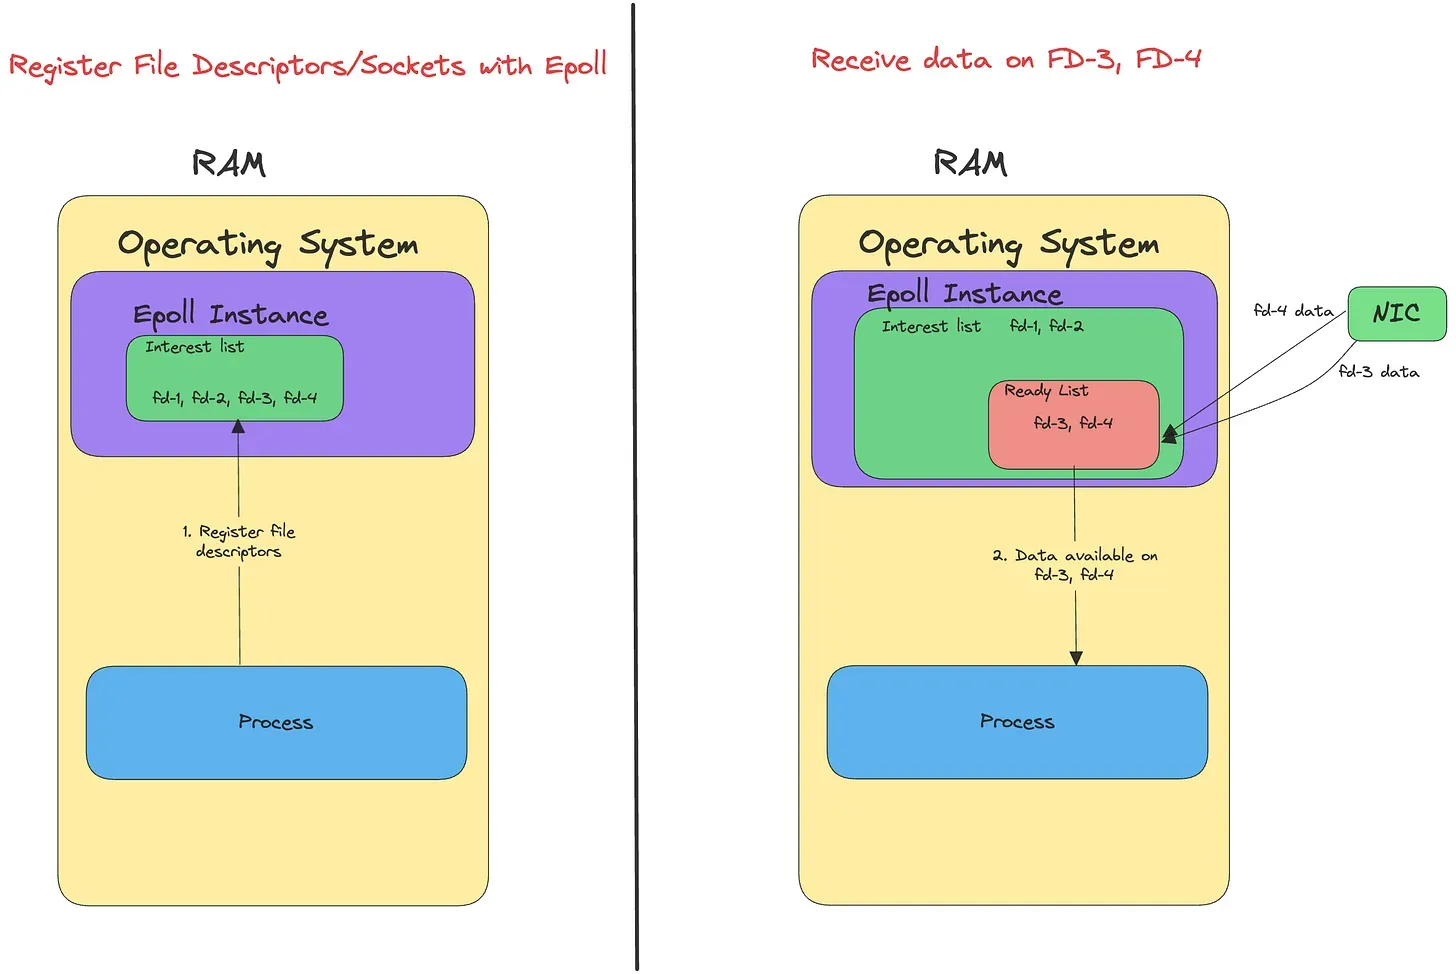
As seen from the above diagram, once data becomes available on fd3, and fd4, the process is notified by the OS.
Let’s now understand this in the context of a NGINX worker.
Nginx worker
Each NGINX worker is single-threaded and it runs an event loop. The event loop works like a while loop and checks for any activity on the socket or new connections.
With non-blocking sockets, the worker doesn’t need to wait till the data is completely sent to the client. It can quickly move onto the next connection and process the request.
Since network I/O is non-blocking, the process doesn’t wait for the data transfer. And the worker uses CPU only for request parsing, filtering and other compute operations.
Compute operations are less time-taking (in order of micro-seconds). As a result, a single worker can process 100K requests every second concurrently.
Assuming that a single worker can handle 100K connections, if it’s a 10-core CPU, the server can handle 1 million concurrent connections. (Example for illustration only, in real world, things might be different).
Note: A server must have sufficient memory to serve 1 million connections since each connection needs 100KB-1MB memory. But the OS kernel can be tuned to reduce the connection’s memory.(there are trade-offs to this approach)
The event-driven non-blocking I/O efficiently utilizes the CPU and doesn’t consume memory like Process-Per-Request or Thread-Per-Request approach.
Installation
Prerequisite: Docker
One of the simplest ways to install and run Nginx today is via Docker:
docker run --rm --name web_server -p 80:80 nginx
This pulls the latest Nginx image and starts a container listening on port 80.
Visit localhost in your Browser and you will see a nginx welcome page.
Configuration
Nginx has one master process and several worker processes. The main purpose of the master process is to read and evaluate configuration, and maintain worker processes. Worker processes do actual processing of requests.
The way nginx and its modules work is determined in the configuration file. By default, the configuration file is named nginx.conf and placed in the directory /etc/nginx.
To view the default configuration file nginx.conf, you first need to exec into web_server container.
docker exec -it web_server bash

cat /etc/nginx/nginx.conf
Changes made in the configuration file will not be applied until the command to reload configuration is sent to nginx or it is restarted. To reload configuration, execute:
nginx -s reload
Once the master process receives the signal to reload configuration, it checks the syntax validity of the new configuration file and tries to apply the configuration provided in it. If this is a success, the master process starts new worker processes and sends messages to old worker processes, requesting them to shut down. Otherwise, the master process rolls back the changes and continues to work with the old configuration. Old worker processes, receiving a command to shut down, stop accepting new connections and continue to service current requests until all such requests are serviced. After that, the old worker processes exit.
Configuration file structure
nginx consists of modules which are controlled by directives specified in the configuration file. Directives are divided into:
- Simple directives consists of the name and parameters separated by spaces and ends with a semicolon (;)
- Block directives has the same structure as a simple directive, but instead of the semicolon it ends with a set of additional instructions surrounded by braces ({ and }).
If a block directive can have other directives inside braces, it is called a context. Eg: events, http, server and location.
Directives placed in the configuration file outside of any contexts are considered to be in the main context.
# nginx.conf is the main context

# simple directives
user nginx;
worker_processes auto;

# block directives
events {

}

http {
    server {
        location {

        }
    }
}
The rest of a line after the # sign is considered a comment.
Serving static content
An important web server task is serving out files (such as images or static HTML pages).
We will implement an example where files will be served from local directory: /var/www (which may contain HTML files and images). This will require editing of the configuration file nginx.conf.
Create this file structure
nginx_example/
├── nginx.conf
└── web_pages
    └── index.html
    └── image.png
Put below content in index.html
<!DOCTYPE html>
<html lang="en">
<head>
<meta charset="UTF-8">
<meta name="viewport" content="width=device-width, initial-scale=1.0">
<title>Document</title>
</head>
<body>
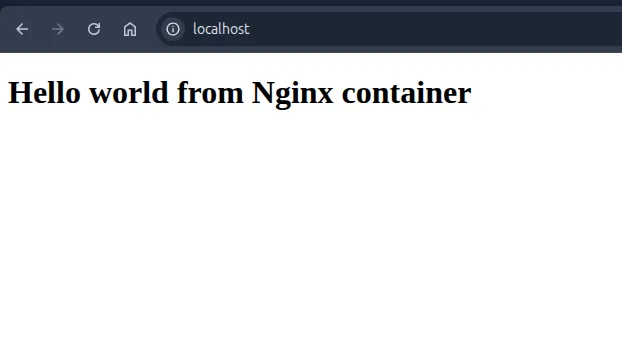
<h1>Hello world from Nginx container</h1>
</body>
</html>
Put below content in nginx.conf
user nginx;
worker_processes auto;

events {

}

http {
    server {
        listen 80;
        server_name _;

        root /var/www;
        index index.html index.htm;

        location / {
            try_files $uri $uri/ =404;
        }
    }
}
Now let's stop our previous nginx container and run new one with new configurations.
But before running below command please make sure you are in nginx_example folder.
cd nginx_example

docker run --rm --name web_server -p 80:80 -v ./web_pages:/var/www -v ./nginx.conf:/etc/nginx/nginx.conf nginx
Visit http://localhost in your Browser and you will see this page
You can also view image file you have put in web_pages folder by visiting http://localhost/image.png
Reverse proxy
One of the frequent uses of nginx is setting it up as a proxy server, which means a server that receives requests, passes them to the proxied servers, retrieves responses from them, and sends them to the clients.
We will configure a basic proxy server, which servers requests of other websites with our custom url like:
- http://localhost/example will serve https://example.com page
- http://localhost/wiki will serve https://www.wikipedia.org page
Put the below content in nginx.conf file
user nginx;
worker_processes auto;

events {

}

http {
    server {
        listen 80;
        server_name _;

        location /example/ {
            proxy_pass https://example.com/;
        }

        location /wiki/ {
            proxy_pass https://www.wikipedia.org/;
        }
    }
}
Now let's stop our previous nginx container and run new one with new configurations.
But before running below command please make sure you are in nginx_example folder.
cd nginx_example

docker run --rm --name web_server -p 80:80 -v ./nginx.conf:/etc/nginx/nginx.conf nginx
In your browser visit:
Conclusion
For me, learning about Nginx was more than just understanding another tool. it gave me clarity on how the internet really works behind the scenes.
At first, I always thought a web server was just something that shows HTML files, but now I realize it’s the backbone that keeps websites fast, reliable, and secure.
While experimenting, I personally liked:
- How easy it was to run Nginx inside Docker with just one command.
- The simplicity of serving my own
Hello Worldpage in a container. - Seeing reverse proxy in action which felt powerful because it showed how requests can be routed seamlessly.
- The event handling architecture of nginx is just pure engineering.
Overall, I find Nginx not only useful for production systems but also a great learning tool to understand networking, load balancing, and scalability.
Writing this blog was part of my journey to simplify these concepts, and I hope it helps others get started with Nginx the way I did.