7 June 2025
Getting Started with Kubernetes for Developers
A developer-friendly introduction to Kubernetes — pods, deployments, services, and namespaces explained with hands-on examples for getting started with K8s.
Kubernetes also known as K8s is an open-source container orchestration system for automating software deployment, scaling, and management.
![]()
Originally designed by Google, the project is now maintained by a worldwide community of contributors and the trademark is held by the CNCF(Cloud Native Computing Foundation).
Kubernetes assembles one or more computers, either virtual machines or bare metal, into a cluster which can run workloads in containers.
What features does it provide ?
- Container Orchestration
- Automatically schedules and runs containers across a cluster of machines.
- Abstracts away the infrastructure — developers just define what the app needs (YAML), Kubernetes handles the rest.
- Declarative Infrastructure
- Everything in K8s is defined as YAML manifests.
- Developers describe the desired state, and K8s ensures the system matches that.
- Self-Healing
- Automatically restarts failed containers
- Reschedules Pods if a Node dies
- Replaces containers if the health check fails
- Health checks
readinessProbe: Tells K8s when the app is ready to serve trafficlivenessProbe: Restarts app if it hangs or crashes
- Rolling Updates and Rollbacks
- Updates can be applied gradually with zero downtime
- Easy rollback to previous versions if the new one fails
- Services and Networking
- Internal DNS service discovery (e.g:
my-service.default.svc.cluster.local) - Supports:
- ClusterIP (default, internal-only)
- NodePort, LoadBalancer, Ingress, GatewayAPI for external access
- Internal DNS service discovery (e.g:
- Secrets and ConfigMaps
ConfigMap: Inject environment variables or config files into containersSecret: Securely store API keys, passwords, etc.
Developers should never hardcode secrets — use these instead.
- Volumes and Persistent Storage
- Store data outside containers via PersistentVolumeClaims (PVCs)
- Good for databases or any app that needs persistent state
- Namespaces
- Isolate environments (e.g., dev, staging, prod) within a single cluster
- Developers can test without affecting production
- RBAC (Role-Based Access Control)
- Controls who can deploy, read logs, access resources
- Essential for teams — especially on shared clusters
- Observability
- Native support for:
- Logs (
kubectl logs) - Metrics (via Prometheus)
- Logs (
- Great for debugging and monitoring performance.
- Native support for:
What is a Kubernetes Cluster ?
A Kubernetes cluster is a group of computers (called nodes) that work together to run your containerized applications. These nodes can be real machines or virtual ones.
There are two types of nodes in a Kubernetes cluster:
1. Master node (Control Plane):
- Think of it as the brain of the cluster.
- It makes decisions, like where to run applications, handles scheduling, and keeps track of everything.
2. Worker nodes:
- These are the machines that actually run your apps inside containers.
- Each worker node has a Kubelet (agent), a container runtime (like Docker or containerd), and tools for networking and monitoring.
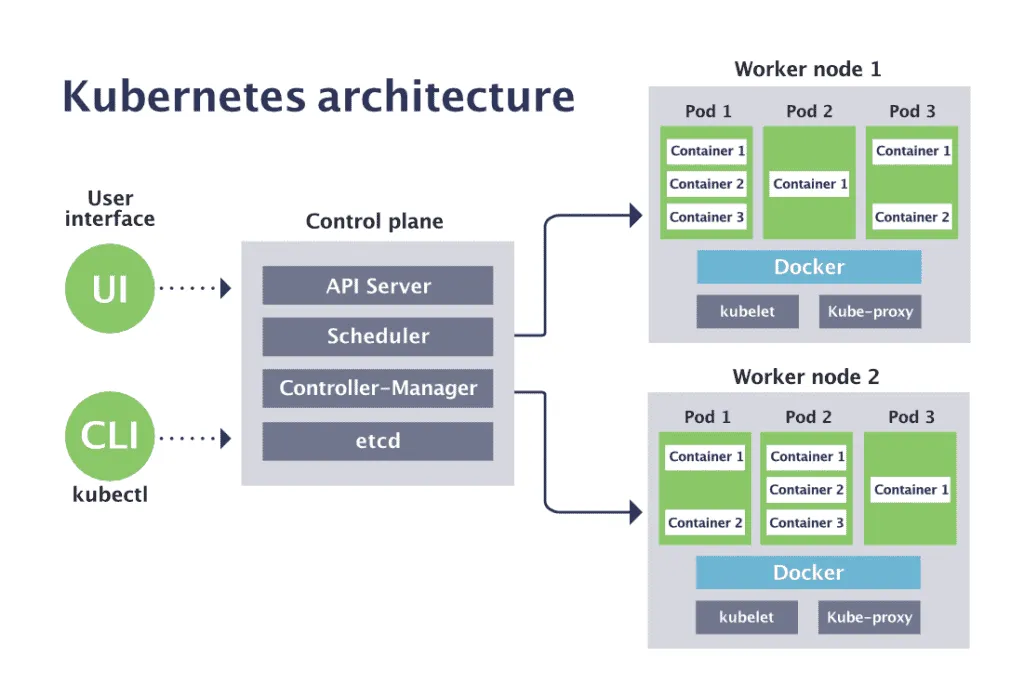
Key Components ( Architecture )
A Kubernetes cluster has many parts working together behind the scenes. Let’s break down the core components we should know:
1. API Server
- Location: Control Plane
- Acts as the front door of the Kubernetes cluster.
- All communication (from users, CLI tools like kubectl, or even internal components) goes through the API Server.
- It processes REST requests, validates them, and updates the cluster state in etcd.
Think of it as the receptionist of a company — every request passes through it first.
2. Scheduler
- Location: Control Plane
- Responsible for assigning Pods to Nodes.
- It looks at:
- Resource requirements (CPU, memory)
- Node availability
- Taints/tolerations and affinities
- It chooses the best node for each pod and tells the API server its decision.
Like a delivery manager assigning packages to the nearest delivery person.
3. Conroller manager
- Location: Control Plane
- Watches the cluster state and makes sure the current state matches the desired state (defined in YAML files).
- Contains multiple controllers:
- Node Controller – watches node health
- ReplicaSet Controller – ensures the right number of pods are running
- Job Controller, DaemonSet Controller, etc.
Imagine a robot checking every 5 seconds if your to-do list is being followed, and fixing anything that's off.
4. etcd
- Location: Control Plane
- A fast, distributed key-value store used as Kubernetes’ backbone database.
- Stores all cluster data — deployments, state of pods, secrets, config maps, etc
- Highly consistent and supports snapshots/backup.
If the API server is the receptionist, etcd is the filing cabinet where everything is saved.
5. Kubelet
- Location: Each Worker Node
- An agent that runs on every worker node.
- It takes instructions from the API server and:
- Ensures containers are running
- Monitors pod health
- Reports back to the control plane
Like a local manager on each node making sure everything is working as planned.
6. Kube-proxy
- Location: Each Worker Node
- Manages networking and communication in the cluster.
- Handles:
- Routing traffic to the correct pod/service
- Load balancing
- NAT rules for service access
Think of it as the node’s network engineer — setting up all the traffic rules so things run smoothly.
7. Container runtime
- Location: Each Worker Node
- Software that actually runs containers on a system.
- Kubernetes supports several runtimes:
- Docker (deprecated)
- containerd
- CRI-O
- Kubelet communicates with this runtime to start/stop containers.
It's the engine that powers and runs your containers, like Docker or containerd.
Local K8s cluster setup
We are going to use docker containers as a nodes and kind to setup the cluster.
To create a local k8s cluster we need following tools installed in our system.
1. Docker
- Installation
Bash
curl -fsSL https://get.docker.com | sh - Allow running docker without
sudoBashsudo groupadd docker sudo usermod -aG docker $USER newgrp docker - Run a
hello-worldimageBashdocker run hello-world
2. Kubectl
- Installation
Bash
curl -LO "https://dl.k8s.io/release/$(curl -L -s https://dl.k8s.io/release/stable.txt)/bin/linux/amd64/kubectl" curl -LO "https://dl.k8s.io/release/$(curl -L -s https://dl.k8s.io/release/stable.txt)/bin/linux/amd64/kubectl.sha256" echo "$(cat kubectl.sha256) kubectl" | sha256sum --check sudo install -o root -g root -m 0755 kubectl /usr/local/bin/kubectl - Check version
Bash
kubectl version
3. Helm
- Installation
Bash
curl https://raw.githubusercontent.com/helm/helm/main/scripts/get-helm-3 | bash - Check version
Bash
helm version
4. Kind
- Installation
Bash
# For AMD64 / x86_64 [ $(uname -m) = x86_64 ] && curl -Lo ./kind https://kind.sigs.k8s.io/dl/v0.29.0/kind-linux-amd64 # For ARM64 [ $(uname -m) = aarch64 ] && curl -Lo ./kind https://kind.sigs.k8s.io/dl/v0.29.0/kind-linux-arm64 chmod +x ./kind sudo mv ./kind /usr/local/bin/kind - Check version
Bash
kind version
Now we have everything installed on our system for cluster setup.
Let's create a k8s cluster which will have 1 Master and 2 Worker node
- Create a
kind-config.yamlfile and copy paste the below content
kind: Cluster
apiVersion: kind.x-k8s.io/v1alpha4
nodes:
- role: control-plane
  extraPortMappings:
      - containerPort: 30080
        hostPort: 30080   # Map container's port 30080 to host's port 30080
        protocol: TCP
      - containerPort: 30443
        hostPort: 30443  # Map container's port 30443 to host's port 30443
        protocol: TCP
- role: worker
- role: worker
- Run below command to create cluster
kind create cluster --config kind-config.yaml
- Check nodes
kubectl get nodes
Output:
NAME                 STATUS   ROLES           AGE   VERSION
kind-control-plane   Ready    control-plane   21m   v1.33.1
kind-worker          Ready    <none>          21m   v1.33.1
kind-worker2         Ready    <none>          21m   v1.33.1
Important K8s Concepts
1. Pods and Deployments
- A Pod is the smallest unit in Kubernetes. It runs one or more containers with shared storage and network resources.
- A Deployment ensures that the desired number of pod replicas are running and manages rolling updates.
- We can list the running pods via following command
Bash
kubectl get pods - Let's create a our first pod using deployment file
nginx-deployment.yaml.YAML# nginx-deployment.yaml apiVersion: apps/v1 kind: Deployment metadata: name: nginx-deployment spec: replicas: 2 selector: matchLabels: app: nginx template: metadata: labels: app: nginx spec: containers: - name: nginx image: nginx:latest ports: - containerPort: 80 - Apply the deployment file
Bash
kubectl apply -f nginx-deployment.yaml - Now list the running pods
Output:Bash
kubectl get podsBashNAME READY STATUS RESTARTS AGE nginx-deployment-96b9d695-9h49b 1/1 Running 0 20m nginx-deployment-96b9d695-rhd8x 1/1 Running 0 20m - We can exec into the pods using the below command to view the files of our container
Bash
kubectl exec -it <pod-name> -- sh - We can also view the logs of the container which process prints on
stdoutBashkubectl logs -f <container-name> - We can describe the pod to view each and every detail of it. if pod crashes or fails to start here we can debug the reason.
Bash
kubectl describe pod/<pod-name> - To delete the pods if we run the below command.The existing pod will delete but new pod will be created by control manager using existing deployment resource which we applied previously.
Bash
kubectl delete pod/<pod-name> - If we want to delete the pods permanently then we should delete the deployment and pod will be removed by k8s
Bash
kubectl delete deployment nginx-deployment - We can also delete K8s deployment resource using our existing deployment file
Bash
kubectl delete -f nginx-deployment.yaml - Wants to read more about pods checkout the K8s Pod documentation
2. Services
- Each pod in a cluster gets its own unique cluster-wide IP address. A pod has its own private network namespace which is shared by all of the containers within the pod. Processes running in different containers in the same pod can communicate with each other over
localhost. - The pod network (also called a cluster network) handles communication between pods. It ensures that all pods can communicate with all other pods, whether they are on the same node or on different nodes.
- If we use a Deployment to run our app, that Deployment can create and destroy Pods dynamically. From one moment to the next, we don't know how many of those Pods are working and healthy. we might not even know what those healthy Pods are named.
- The Service API lets us provide a stable (long lived) IP address or hostname for a service implemented by one or more backend pods, where the individual pods making up the service can change over time.
- A Service exposes pods to internal or external traffic. So we have several types of services:
- ClusterIP : This is a default service type. it exposes service on cluster's internal ip and makes it reachable only from within the cluster.
- NodePort : Exposes service on each Node's IP at a static port(the NodePort). The default range of NodePort is 30000–32767 .
- LoadBalancer : Exposes the Service externally using an external load balancer.
- Let's access our nginx pod from outside of the cluster using NodePort service.
- Create a
nginx-service.yamlfile and copy paste the below content.YAML# nginx-service.yaml apiVersion: v1 kind: Service metadata: name: nginx-service spec: type: NodePort selector: app: nginx ports: - port: 80 targetPort: 80 nodePort: 30080 - Let's apply the service manifest using below command.
Bash
kubectl apply -f nginx-service.yaml - To list the services run the below command
Output:Bash
kubectl get servicesBashNAME TYPE CLUSTER-IP EXTERNAL-IP PORT(S) AGE kubernetes ClusterIP 10.96.0.1 <none> 443/TCP 49s nginx-service NodePort 10.96.165.229 <none> 80:30080/TCP 8s - Now if we open the localhost:30080 in our browser. we will see a page served by our nginx pod.
- Wants to read more about k8s network model checkout the K8s services documentation
3. Namespaces
- Namespaces provide a mechanism for isolating groups of resources within a single cluster.
- Names of resources need to be unique within a namespace, but not across namespaces.
- Namespaces cannot be nested inside one another and each Kubernetes resource can only be in one namespace.
- Kubernetes starts with four initial namespaces. We can list the current namespaces in a cluster using below command.Bash
kubectl get namespaces
Output:BashNAME STATUS AGE default Active 78m kube-node-lease Active 78m kube-public Active 78m kube-system Active 78m - Most Kubernetes resources (e.g. pods, services, replication controllers, and others) are in some namespaces. However namespace resources are not themselves in a namespace. And low-level resources, such as nodes and persistentVolumes, are not in any namespace.
- To see which Kubernetes resources are and aren't in a namespace:Bash
# In a namespace kubectl api-resources --namespaced=true # Not in a namespace kubectl api-resources --namespaced=false - To see all the resources of a particular namespace flag every command with
-n <namespace>such as to view running pods inkube-systemit would be.Bashkubectl get pods -n kube-system - Create a new namespaceBash
kubectl create namespace mars
4. Configmaps and Secrets
- A ConfigMap is an API object used to store non-confidential data in key-value pairs.
- Pods can consume ConfigMaps as environment variables, command-line arguments, or as configuration files in a volume.
- A ConfigMap allows you to decouple environment-specific configuration from our container images, so that our applications are easily portable.
- List all configmaps
Bash
kubectl get configmaps - To read more about configmaps and its usage please refere this k8s Configmap documentation
- A Secret is an object that contains a small amount of sensitive data such as a password, a token, or a key.
- Secrets are similar to ConfigMaps but are specifically intended to hold confidential data.
- List all secrets
Bash
kubectl get secrets - To read more about secrets and its usage please refer this k8s secrets documentation
Demo of kind cluster and nginx application
Learning Resources
- Kubernetes Crash Course for Absolute Beginners
- Kubernetes Crash Course: Learn the Basics and Build a Microservice Application
- What is Kubernetes? | Kubernetes Explained
- Kubernetes Documentation
- Virtualization , Containers and role of docker in it
- Below Kubernetes: Demystifying container runtimes
- Certified Kubernetes Administrator
- Understanding Kubernetes Networking in 30 Minutes
Conclusion
Till now we have just covered tip of the iceburg. We have alot to learn about kubernetes but the topics we have covered are just enough to get you started using k8s in local setup and explore its architecture.
For production grade cluster setup and k8s distributions we will talk in another blog. So stay tuned.
Thanks for sticking around and practicing!
Until next time happy coding!